


Price levels such as mitigation blocks often relate to price levels that are discussed in relation to mitigation concepts and historical market activity. When price approaches these areas, its behaviour—whether it rejects, breaks through, or consolidates—can provide insights into market sentiment and potential future direction.
By observing how price reacts to these levels, traders may observe recurring price patterns or commonly referenced areas on the chart, avoid false breakouts, and time entries and exits more effectively.
In this blog, we will cover everything about mitigation blocks.
What is a mitigation block?
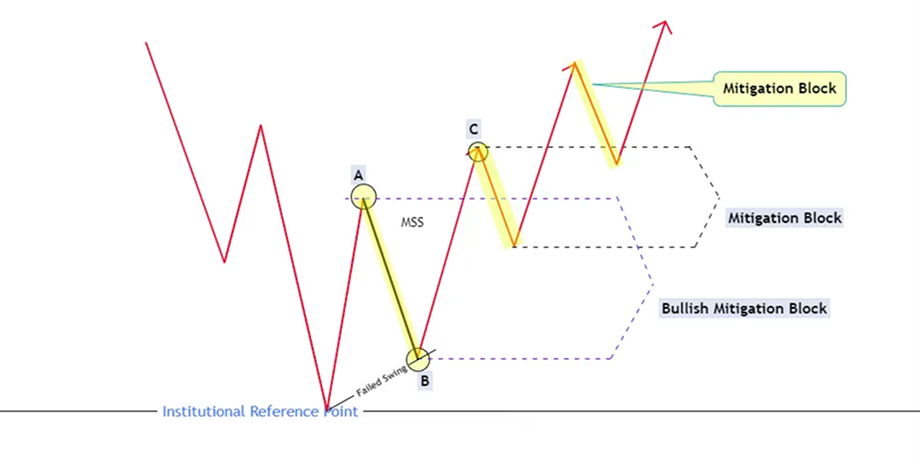
A mitigation block in trading refers to a price zone or range where the market has previously reacted strongly, often reversing or slowing down. It typically represents an area where supply and demand are in balance, and the market may experience support or resistance during future price movements.
Traders use mitigation blocks to manage risk or enter trades when price revisits these zones, anticipating a reaction based on previous price behaviour. These blocks often align with concepts from order block theory or supply and demand zones, aiming to capitalise on price retracements to key levels.
How mitigation blocks differ from supply and demand zones
Mitigation blocks and supply and demand zones represent key price levels, but they differ in focus and application. Mitigation blocks are specific price areas where the market has previously reacted sharply, often due to unfilled orders, and are revisited to correct previous imbalances. These blocks are used primarily for short-term entries, aiming to capitalise on price retracements.
On the other hand, supply and demand zones are broader areas where strong long (demand) or short (supply) trades have occurred, indicating potential future support or resistance levels when the price revisits them.
While supply and demand zones reflect general market imbalances, mitigation blocks are a more refined concept used to address previous inefficiencies. Essentially, mitigation blocks focus on correcting sharp market moves, whereas supply and demand zones highlight areas of past dominance by bulls or bears.
Key characteristics of a valid mitigation block
Break of structure confirmation
A mitigation block is generally referenced in the context of a prior market structure break followed by observable changes in price behaviour. This confirms that the previous price move was unsustainable and suggests a potential reversal.
Presence of imbalance or inefficiency
Mitigation blocks occur in areas of market inefficiency or unfilled orders. These zones represent imbalances where prices may return to correct previous price moves.
Engulfing or strong rejection candles
Look for engulfing or strong rejection candles near the mitigation block. These candlestick patterns signal a sharp reversal, confirming the market's rejection of the previous price move.
Proximity to previous supply or demand zones
Mitigation blocks often occur near previous supply or demand zones where past price reactions took place. These zones enhance the likelihood of price reacting similarly when revisited.
Occurs after a liquidity sweep or stop-hunt
A valid mitigation block typically forms after a liquidity sweep or stop-hunt, where price triggers stop orders before reversing. This sets up a strong opportunity for a market correction.
Clean retest before continuation
For confirmation, a clean retest of the mitigation block before the price continues in the expected direction indicates strong market support. This retest ensures the block's effectiveness as a reversal point.
Why should one rely on mitigation blocks
The following information is provided solely for educational purposes and does not constitute personal advice or a recommendation to trade margin FX/CFDs.
Provides context for reviewing areas of interest alongside predefined risk considerations
Mitigation blocks help pinpoint exact levels for entering trades, minimising exposure and allowing for more controlled risk management by targeting areas with high potential for price reversal.
Provides context for observing potential changes in trend and market behaviour
These blocks are often referenced when discussing price trends and observable changes in market behaviour. They indicate areas where market inefficiencies or unfilled orders have previously caused significant price movements, confirming that a trend change or reversal is likely to occur.
Often referenced when reviewing price movements within broader market context.
Mitigation blocks filter out market noise and false breakouts. They focus on areas where price action has historically responded, preventing traders from being trapped in fake-out moves or choppy price action.
Encourages traders to seek additional context within their broader market analysis before making decisions
By waiting for a price retest of the mitigation block, traders avoid entering too early. This strategy improves trade accuracy, ensuring entries are made at levels where the price is most likely to reverse.
How to trade entry setups around mitigation blocks
- Identify key mitigation block zones on the chart: Look for areas where price has previously reacted strongly, creating sharp reversals. These zones are potential mitigation blocks, indicating areas of market inefficiency.
- Confirm with price action for trend alignment: Ensure price action confirms the trend direction. A valid setup occurs when the mitigation block aligns with the overall market trend, strengthening the probability of an accurate trade.
- Wait for the price to retrace to the mitigation block: Allow the price to pull back to the mitigation block zone. This provides a better entry point, as the market may revisit the area to correct inefficiencies.
- Look for rejection candles or patterns at the block: Observe for strong candlestick patterns like pin bars or engulfing candles. These indicate price rejection at the block, suggesting a potential reversal or trend continuation.
- Ensure confluence with other indicators or support/resistance levels: Check for additional confirmation from indicators like RSI or moving averages or ensure the mitigation block coincides with previous support/resistance levels, increasing trade reliability.
- Stop-loss placement is often discussed in relation to areas just beyond mitigation blocks as part of broader risk considerations: Place the stop-loss slightly outside the mitigation block to limit risk. This minimises exposure in case the price fails to react as expected.
- This area is often discussed when price action shows signs of rejection, as part of broader market analysis: Enter the trade when rejection is evident through candlestick formations or price action, which some traders view as an indication that price behaviour around the mitigation block may be changing.
- Monitor for a break/hold at the mitigation block for confirmation: Watch how the price behaves after entering. If the price holds or breaks the mitigation block, it further validates the setup, confirming the trade's direction.
Read market cues through price action
Price action at key levels reveals the true intent of market participants. Rejections, consolidations, or breakouts around these zones signal potential reversals or continuations. Understanding how price behaves at support, resistance, or mitigation blocks enables traders to time entries, manage risk better, and align trades with market momentum.
Disclaimer: All material published on our website is intended for general information and educational purposes only. It does not constitute personal financial advice, as it does not take into account your objectives, financial situation, or needs. Margin FX and CFDs are complex and high-risk financial products that may not be suitable for all investors. These products are highly leveraged, gains and losses are magnified, and you may lose substantially more than your initial deposit. Investing in these products does not provide any entitlement to the underlying assets (e.g., the right to receive dividend payments). We recommend seeking independent financial advice before making any investment decisions.